


Hey Folks...!

What is Git?
Git is a version control system. It is used for tracking changes in any set of files, usually used for coordinating work among programmers collaboratively developing source code during software development.
It keeps the track of all the projects and changes eventually you made within the project. Every single manipulation you make into your project keeps track of everything once you initialize git.
Platforms for Using Git:
There are several options for using git to host your website. Among those, the most used ones are:
GitHub
GitLab
Bitbucket
GitHub:
GitHub is a web-based interface that uses Git, the open-source version control software that lets multiple people make separate changes to web pages at the same time.
The number one, at least in terms of popularity, is definitely GitHub – the most famous web-based Git repository hosting service. Officially over 70 million users are registered there. This is not a coincidence as GitHub provides many useful features and is in many cases free, e.g. for open-source projects.
GitLab:
The second most popular website for version is GitLab. The difference is quite big because it has about 30 million users. The basic functionality is similar to that of GitHub.
Bitbucket:
Another big player in the Git hosting services market is the industry giant Atlassian with its Bitbucket, which has over 10 million registered users.
How to use git and GitHub?

For using git for off all you will need to have Git installed into your local system if you are Windows or a Linux user. For Mac users, Git has already been preinstalled there so no need to install it manually.
Next, create a GitHub account.
Step 1: Create a local git repository -
When creating a new project on your local machine using git, you'll first create a new repository or often, 'repo', for short.
To use Git we'll be using the terminal. Move to where you want to place the project on your local machine using the command 'cd' to change the directory.
for example:
cd Desktop/Projects/FSJS
To initialize a Git repository in the root of the folder, run the git init command.
git init
Initialized empty Git repository in /Users/Desktop/myproject/.git/
Step 2: Adding files to the repository:
After creating code files or text files using any text editor you will still wonder that the Git is still not able to track your files. But git will notice that the file exists inside the repo. Git only saves/manages changes to files that it tracks, so we’ll need to send a command to confirm that yes, we want git to track our new file.
After creating the new file, you can use the git status command to see which files git knows to exist.
Step 3: Commit-
In Git, a commit is a snapshot of your repo at a specific point in time.
To commit any file to the repo, first, you will have to add the files to the staging area which is a preview of your next commit. To do so use the following commands:
git add index.html
git commit -m "index page added"
For adding a file to the staging area you can sile use the 'add' command and a file name successively or simply a . (dot) for adding all the files present in the current directory.
In committing the '-m' means the message which you will have to pass in the double quotes, without message commit will not take place.
To check the status and list of commits you can use the git status command and git log respectively.
The message at the end of the commit should be something related to what the commit contains - maybe it's a new feature, maybe it's a bug fix, maybe it's just fixing a typo. Don't put a message like "asdfadsf" or "foobar".
Step 4: Create a new branch-
Now that you've made a new commit, let's div into a something little more advanced.
Let's think you want to make some new changes to your existing project but you are worried about losing previous ones. Here comes the concept of git branching.
Branches allow you to move back and forth between the 'states' of a project. Official git docs describe branches this way: ‘A branch in Git is simply a lightweight movable pointer to one of these commits.’ For instance, if you want to add a new page to your website you can create a new branch just for that page without affecting the main part of the project. Once you're done with the page, you can merge your changes from your branch into the primary branch. When you create a new branch, Git keeps track of which commit your branch 'branched' off of, so it knows the history behind all the files.
For creating a branch use the following command:
git checkout -b <my branch name>.
user:myproject $ git branch
  master
* my-new-branch
The asterisk sign shows your current where you are at a given instance of time.
By default, every git repository’s first branch is named `master`.
Step 5: Create a new repository on GitHub-
If you only want to keep track of your code locally, you don't need to use GitHub. But if you want to work with a team or want to showcase your code, you can use GitHub to collaboratively modify the project's code.
To create a new repo on GitHub, log in and go to the GitHub home page. You can find the “New repository” option under the “+” sign next to your profile picture, in the top right corner of the navbar:

After clicking the button, GitHub will ask you to name your repo and provide a brief description:
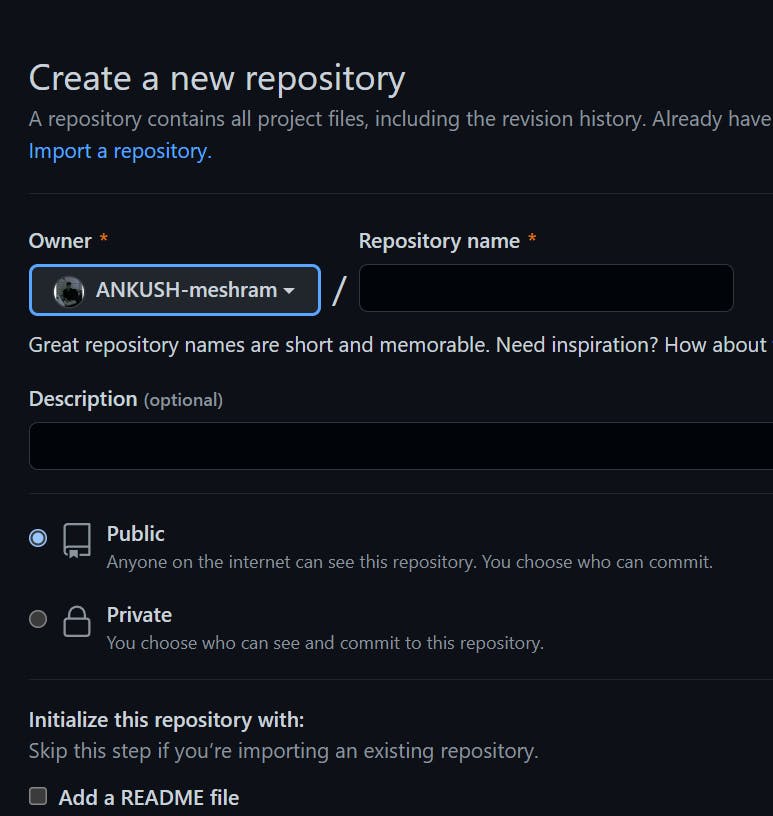
When you're done filling out the information, press the 'Create repository' button to make your new repo.
GitHub will ask if you want to create a new repo from scratch or if you want to add a repo you have created locally. In this case, since we've already created a new repo locally, we want to push that onto GitHub so follow the - or push an existing repository from the command line section:
user :myproject user$ git remote add origin https://github.com/cubeton/mynewrepository.git

user:myproject user$ git push -u origin master
warning - Do not copy the url which is given in above code. You must copy the url which will be flashing in your remote repo.
Step 6: Push a branch to GitHub-
Now we'll push the commit in your branch to your new GitHub repo. This allows other people to see the changes you've made.
To push changes onto a new branch on GitHub, you'll want to run git push origin <yourbranchname>. GitHub will automatically create the branch for you on the remote repository:
git push my-new-branch
Step 7: Create a pull request (PR)-
A pull request (or PR) is a way to alert a repo's owners that you want to make some changes to their code. It allows them to review the code and make sure it looks good before putting your changes on the primary branch.
Readme File:
A Readme file or markdown file is a quick sneak peek of what you have done in your project or what your project is about. In other words, it is a disclaimer for your project or the goal and agenda of your project.

My GitHub profile:
Hope you will give your valuable feedback on how is the article and how helpful is it or not.
B..bye....!
Connect me on: